Crafting a Canoe From Firewood by Ken Briggs, Whitehorse, YK, Canada

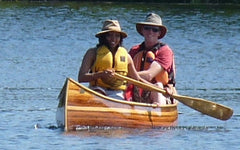
“Hold your finger right there, don’t move it.” We’d been rubbing our fingers over the smooth, silky hull and had felt a slight imperfection. Out came the sander. That bump got smoothed and inspection of the strip canoe resumed.
It’s spellbinding to see a wood strip canoe materialize. Strip by strip the canoe comes alive.
Yukon beetle killed firewood is central to the Briggs family. We use it for firewood, and, we use this dry, durable wood made into furniture, wooden bowls, steak or sandwich boards, or built into cabins or shops. This wood shimmers in the sun.
It was a natural progression, when my husband, Ken Briggs contemplated his big load of beetle killed firewood, to pronounce, “Why not use fire wood to make my canoe?”
It was foreordained: a pile of 20 foot logs, required a few steps prior to gluing wood. Chosen logs were sawn on a portable band saw mill. Full 1x10 inch boards were cut, then planed down to 7/8 of an inch thick. These boards were then cut into ¼ inch thick strips with as thin a blade as possible, not being particularly careful in handling, as he required resilient boards. Finally, each strip was milled with a bead and cove so they’d fit together.
A pile of milled spruce strips makes not a boat. A hull shaped form is needed. Ken’s formwork, was built on a 2x10, called a Strongback. A Strongback is “like concrete foundations for your house. Any defect will ricochet all the way down the line, and it will cause endless problems.” A Strongback is a straight level base that the formwork of the boat is fastened to. The formwork, cut out of half inch plywood from a template Ken designed, was nailed to the Strongback. As Ken said, “It doesn’t have to be off a lot to have a crooked boat. You really have to use a string line to line-up forms. Everything must line up.”
Next came gluing spruce strips onto the formwork and nailing them with miniscule nails to keep them in place. For interest, some cedar strips were added.
While Ken worked on his strip canoe he recounted how his passion for boats began as a small child, dreaming about and playing with boats. His Grandad further fueled it by helping him build a boat, and instructing him on how to sharpen and care for tools. Those lessons transferred into realizing the importance of accuracy and patience, as in, gluing strips of wood to the hull.
Putting strips on didn’t take that long. It’s an engrossing, exacting and a rather magical process. At first there is one single strip. Then slowly the hull begins to take shape. With every strip, mostly spruce, and an occasional cedar insert the project moves closer to a finished hull. Spruce proved to be strong. The 16 foot lengths took all the bending and twisting required. At the centre of the hull Ken made joints, using long tapers.
Once all the strips were glued and nailed, all nails were removed and miniscule holes and imperfections or cracks were filled with an epoxy and sawdust wood filler.
This next stage: patience and sanding! Initial smoothing was with a 50 grit sanding disk on a side grinder. Next 80 grit on a palm sander did the job. When the hull was judged smooth, Ken raised the grain by wetting down the entire boat Once dry, he palm sanded using 120 grit paper.
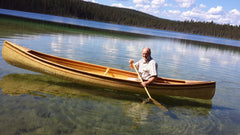
Finally came fibreglassing! The 6 oz. fiberglass cloth was draped over the entire hull and clamped in place. Ken applied Epoxy Resin, which is generally used by boat builders as it bonds well to wood. (Of course it was minus 30 celcius outside. It was crucial to keep the shop very warm.) Sanding continued, between thin coats of epoxy. The final sanding was with wet 400 grit paper on the palm sander. That made a white paste, which had to be washed off. This labour of love took weeks and once done I could conceive a glossy form sliding through the water reflecting it’s shine.
Ken stands back from his work and says, “If you get joy out of spending time and putting a little touch or something special into your creation, then you should build a strip canoe. One shouldn’t be intimidated by it. Even if your job isn’t perfect the wood comes to your rescue.”
Now – ten weeks later - Ken’s doing trim work – gunnels, seats, thwart, decks. The final touch will be spar varnish for protection from the sun.
In contemplating this woodworking project Ken remarks, “It’s nice to use Yukon wood to make a canoe and not buy the materials. Maybe you have to be a bit of a dreamer to have a canoe like this. There are Kevlar and composite plastics that are excellent.”
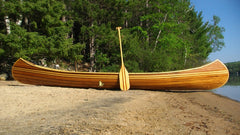
He adds, “If you have any artist in you, you’ll love a strip canoe. It fits in with the trees and streams, with the natural world. When you build something you put a bit of yourself into it. It’s not mass produced. If you build in some little flourish then every time you look at it you’ll smile. ” And smile Ken will. When he built the keel he searched through all the spruce strips to find some containing a bit of blue colour, “so that when I sit in the canoe in the future I’ll be able to look at it and smile.”
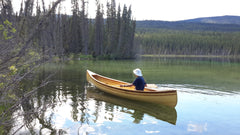
Since this article was written for the Yukon News we have been on a couple of river trips here in the Yukon.


Related Posts
From Dream to Reality by Peter Morrison, Nepean, ON Canada

Freedom 55 by Francois Vaillancourt, QC, Canada