When the Worst Happens: How to Repair a Damaged Canoe

The unfortunate owner of the canoe above took his hull still on the strongback out of the garage temporarily to sand it. That's usually a good practice, since it helps keep dust out of the work area. In this case, however, disaster struck when a freak gust of wind toppled it over. Since it was still mounted, the damage was quite severe. In the photo you can see where the planking was damaged between two stations.
If, heaven forbid, something similar should happen to you, all is not lost. The important thing is to get the hull back in position on the strongback. Next, cut out the damaged section and prepare some new strips longer than the actual break. This will allow you to get a fair curve when you put in the new wood. For instance, because this break was a foot long, the new pieces should be 2-3 feet long.
After you install the new planks, apply a fibreglass patch larger than the damaged area. Isolating this area with tape so epoxy doesn’t run all over the boat makes cleanup easier. After applying the epoxy and letting it set, fair the edges of the fibreglass cloth with 120 grit sandpaper. The patch will seem glaringly obvious at first, but once you've reapplied epoxy and feathered the edges the repair will be virtually invisible.
Fixes like these aren't just reserved for damage. Once Ted, working long hours to meet a deadline, managed to install an arrow pattern backwards - instead of pointing boldly forwards, they pointed in opposite directions on either side of the canoe. He used the technique above to fix his aesthetic gaff, but you'd never be able to tell from the finished product.
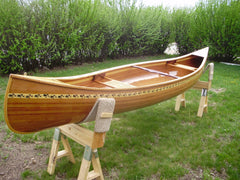
We're also seen smaller holes fixed with beautiful looking inlay work, so a canoe can wear its war wounds like decoration. If your pristine build suffers a setback, don't despair. You can transform the damage seen in the first photo below into the kind of gorgeous detailing seen in the second.
PS: We never leave boats unattended outside any more - we always tie them down. We had a C4 racing canoe blow off the horses where it was resting in our yard when hit by a big wind, and it went end for end across the pavement. We were horrified but the only damage luckily was to the varnish and we easily repaired it.

Builder's nightmare

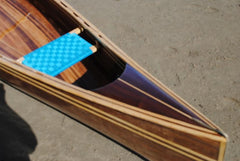
Sample patch
Example of decorative features
Related Posts
The 12 Month Canoe Season by Jean Gregoire, Notre-Dame des Pins, Quebec, Canada
My Love of Boats Began Early by Steve Ballew, Lavina, MI, USA